Making a Lobster Pot in Pictures Part 3

The Connemara lobster pot uses the creel type base. In effect using the stakes to form the base. It is sturdy and just as strong as the Cornish or Devon Bell shaped pot base..

The bars are created by bending down 2 stakes from each end. Creating a warp for the remaining stakes to be woven over and under. A total of 16 are used.
The bars are created by bending down 2 stakes from each end. Creating a warp for the remaining stakes to be woven over and under. A total of 16 are used. The stakes are threaded under the top row of knot weave.
Here we can see where the stakes are threaded under in more detail.
Before the remaining stakes are turned down a packing weve is completed at both sides. This weave is used to fill in the circular gap at each end.
Before the remaining stakes are turned down a packing weave is completed at both sides. This weave is used to fill in the circular gap at each end.
Packing completed at both ends
The remaining stakes are knocked down, going over and under the four bars. Filler pieces are needed to fill in the gaps between the stakes. Because the remaining stakes will not completely fill the space that is left.
The base is near completion.
The complete lobsterpot

The lobster pot took me 6 hours to make, with respect to dimensions the pot came out 1.5 inches deeper than it needed to be. But it would still work. I occasionally take it to events, as a talking point. Often people admire the beauty of the shape and want to have one as a feature in their garden. The lobster pot often did not last for more than one season depending on how choppy the seas were. There are old pictures of pots used until they are battered and mis-shapen. The new pots don’t seem to have the same appeal.

Making a Lobster Pot in Pictures Part 2

The second part of the blog shows how the lobster pot gets its rounded shape. We have now pulled the structure from the ground and flipped it over. The tying up of the long stakes is crucial for shaping the pot. A clove hitch is the best knot for securing the stakes so they do not loosen while weaving. The more we play about at this stage to get the shape the better it turns out. Now we can work sitting in a low chair with the pot on our lap, much more comfortable!

The mouth stakes have been pulled out of the ground, the whole structure turned over and each opposite pair of long stakes brought up to form a bulbous shape and tied.
A central rope is secured on a piece of wood through the mouth to compress the globe shape even further
Perched on and controlled by the knees, weaving commences
The knot weave used here is best described as a double pairing, where each weaver of the pair is woven individually. It is very strong and I find it easier than fitching which is the other weave used on lobster pots common  in Cornwall and Devon.
The knot weave used here is best described as a double pairing, where each weaver of the pair is woven individually. It is very strong and I find it easier than fitching which is the other weave used on lobster pots common in Cornwall and Devon.
The lobster pot grows, the knot weave spirals around, making sure the gap between each layer is no more than 2 inches. Dont want the lobster escaping.
Siding is completed by weaving two layers of knot weave one on top of the next (no gap), to create a strong top edge

Part three will show how to turn down the base.

Making a Willow Lobster Pot in Pictures

We attend a Bushmoot every year and teach the good people a number of skill workshops. Last year I was asked if I knew how to make a lobster pot. I researched lobster pots, talked to my basketry friends and decided on making a creel type lobster pot as described in Joe Hogan’s book ‘Basket making in Ireland’. An unusual book in that it describes the cultural history of the baskets and follows with a technical ‘how to’ section. I know how to make the irish creel, and have taught this for a few years now, The Connemara pot uses many of the same weaves and techniques. For one it uses the double pairing knot weave used on the side walls of the creel and secondly the stakes are knocked down to form the base. The biggest job is getting the shape.  So this year I will be teaching how to make the North Connemara creel type lobster pot to the bush-mooters. Of course there are not many lobsters in the sea anymore, but once you get the techniques you can increase the ‘mouth size’ and catch crabs as well. I think it is a beautiful thing in its own right. Certainly there is much to be said for a pot that is biodegradable and does not use plastic or wire which ends up on our shores and in the stomachs of sea-life.

There will be three parts to this ‘make a lobster pot by pictures blog’, here is part 1

lobsterpot1
Eight 8ft stakes are placed in the ground forming a circle.
The sides are paired to create a 'mouth'
The sides are paired to create a ‘mouth’
Eight more stakes are inserted in the the left of each of the original eight stakes. The stakes are then brought down horizontal, and secured by digging into the soil.
Eight more stakes are inserted into the left of each of the original eight stakes. The stakes are then brought down horizontal, and secured by digging into the soil.
The pairing weave begins at the mouth of the pot.
The weave opens out the stakes.
Twelve more stakes are added to make c.28

Irish Creels: The woven load bearing basket

creelcropLearning how to make an Irish creel was incredibly satisfying; it was so strong and practical but had a beautiful simplistic nature to it. For starters it is made in the opposite direction to traditional stake and strand flat based baskets. The stakes are put in the ground or a jig and the top of the basket is woven first. The creel does not have a woven border; instead an incredibly tight weave called the mouth-wale is used for the first round of weaving. The stakes are trimmed some two inches above this weave at the end, it clasps the rods so hard there is no risk of it slipping off in use.

bushmoot creel3The next stage is the knot weave which is a combination of French randing and a knot weave which is again unique to the creel. This can be very confusing to the beginner as the French randing travels clockwise around the basket and the knot weave travels anticlockwise. Each weave is used alternately. Mistakes are not easily forgiven as the work has to be undone until the ‘trapped rod’ can be freed and worked correctly. Once you get into the weave you begin to create solid side walls which are very tough.

Traditionally the Irish creel has a ‘window’ a space created by pushing the weavers a few inches above the last round of weaving. It gets tied in by the next knot weave which clasps the stakes similar to a fitch (a weave designed to grasp the stakes so it can be used to create space above or below it and not move). I guess this feature was put in because it looks good and there are a few less inches to weave!

Finally a ‘top knot’ is woven at the required height, the best I can describe it is a double pairing, which braids itself around each stake to create a firm layer which is used to thread through the be. The base I feel is the clever part, on a flat based basket the base takes proportionally a lot of time to weave certainly if you want a hard wearing base which will take your stakes tidily and evenly. On the Irish creel this part is omitted and instead the stakes become the base. On the long side (presuming it is a rectangular donkey creel) a warp is created, by folding down the stakes and threading them under the top knot. The short side stakes are woven under and over this warp. Hard work but not technically difficult. Finally there will be gaps so discarded pieces of willow can be used as ‘fillers’. All remains is the strength to pull the structure out of the ground or jig and trim the stakes.

The creel known in Irish as cliabh (pronounced cleeve) was a commonly used basket made for carrying turfs, seaweed and loads to and from market. The creel in Ireland took many forms according to what it carried and where it was made. The rectangular creels were used as donkey panniers to carry turf, also as back creels for people to carry heavy loads. A variation on the back creel was the shoulder creel, more suited to carrying loads short distances with the convenience of being easily emptied. In Western Ireland where seaweed was regularly gathered to fertilise the crops a creel was commonly made with a semi open base to let the water drain out. Similarly another clever variation called the pardog had a hinged bottom for facilitating the load falling out while the pannier remained straddled on the donkey. A clever trick to be sure.

Of course all these types of creel use all the same weaves and techniques, so once they have been learnt you can construct whatever shape or feature you require. The creel even gets close to being used as a cart, the Kish, is a creel fitted on a slide car which the horse pulled. Used up until the 1930’s it was especially used to bring down loads of turf from the mountain bogs. Eventually being replaced by the wheeled cart.

The creel is a basket worth making today. It can be used for storing vegetables, moving vegetables, as a back carrier for wood collection (imagine going for a walk in the woods and slinging the small branches in your back creel). I have been told by Joe Hogan (the accomplished Irish basket maker who taught me) that the creel makes an excellent bike basket. I would not say it is an easy basket to make, but I have taught the creel to a range of people and find that if we give our selves enough time to go steady, the baskets secrets unfold and the troubling knot weave eventually embeds in our brains

As a land-based worker it is well worth taking the time to learn these weaves to make useful tough baskets. It is even more convenient if you grow the willow yourself. The farms in Ireland always had a sally bed in which the willow was grown. Each year it was cut as soon as the willow was dormant during November to March. The cut willow was stored for 4-6 weeks until it was semi green. This meant it had partially dried but was still flexible giving them the best of both worlds. For another 4-6 weeks the willow would remain pliable and the farming people could make all the baskets they needed for the coming year. This naturally coincided with the quiet period on the farm.

Using this window of time to the best advantage means you do not have to re-soak the willow, considering big stuff in its dried state can take more than a day per foot to soak this saves more work. These simple ways often highlight how farmers worked with nature in a symbiotic relationship that harmed little and cared a lot more. Plastic boxes are incredibly useful but if we can replace even a proportion with 100% biodegradable crates and baskets we can make and repair with our own hands then we will be doing a service to ourselves and future generations.

Ref: Basket Making In Ireland Joe Hogan

Re-discover our ‘Out of Town’ Craft Skills

In the late 70’s there was a TV series called Out of Town and as a small child I would sit with my father and watch it with fascination. It featured Jack Hargreaves an old boy visiting the craftsman of the countryside practising their arts and telling their tales. It was a window into an alien culture as in our local town there were no blacksmiths, coopers or wheelwrights down the road but still it seemed relevant.

IMGBasketry is one of these old skills and one that has been with us from our early beginnings. The skill is essential to most of our important and diverse innovations: boats, fish traps, armour, tools, hats, bee hives, shelters and every kind of container imaginable. Each region using their locally grown materials to hand.

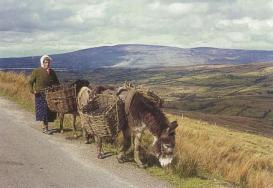
Some years later as an adult I had left the city pioneering a simpler and more sustainable livelihood. I was drawn into hedgerow and willow basketry, I learnt frame baskets first, as they are easy to construct and use only one weave: randing. You gain a feel for the materials, and then start remembering the DSCF0003repetitive patterns and techniques which help shape your work. At the end of the day you can bathe in the satisfaction of making a practical container which is made from 100% natural materials and with care and repair can last 50 years. As time went by I continued to add to my skills, learning many more techniques which have included donkey panniers, lobster pots, plant supports, coracles and hurdles.

Rediscovering the ‘out of town’ craft skills for real I realised the TV series was not a sentimental walk through a bygone era but a path to re-discover skills and RedFireFarm2.jpgknowledge from the past that did not harm the earth and had answers to some of our most pressing environmental crisis. How do we change the way we live? If we seriously look into how we reduce our CO2 emissions by 80% we see that re-ruralisation, localised organic agriculture and re-localised economies will be the dominant 21st century trend. For us to drive this trend from the grass roots we need to pioneer ways out of the city: re-skill and re-learn what we are doing and why we are doing it. We have to be the change we want to see.

shavinghorses 020I am part of the Rural Skills Trust, a not for profit group set up to advance education and training in sustainable rural skills which conserves and protects the environment and in particular focuses on the threats of and practical solutions to climate change. At present we are focusing on sustainable skills in farming and forestry such as hedgelaying, hedgerow renovation, basketry and coppice practice. Skills which inspire people to change their lives and livelihoods. We encourage education, self enquiry and dialectic as a means of collective action. We are informed by the wisdom of the Buddhas as a path to taking appropriate action on climate change. The Trust is part of the 4nobletruths of climate change project (4nobletruths.org). We are always interested in talking to people who would like to get actively involved in this project.

RST are teaching the ‘out of town’ basketry skills camps as I believe there is a new wave of   land-based workers, permaculturists, small holders who would find these skills useful in their daily working lives. Such basketry skills were commonly used in our recent past, passed on through family members, young farmers clubs and community ties. We can re-learn these skills today.

We will be running 4 day basketry skills camps this June and July in rural Carmarthenshire. The course is an intensive designed to pass on the basic skills and knowledge for the landbased worker to make the baskets they need for their practical work and domestic life.

On this course you will decide how you use your time and what projects you wish to learn. You can book all four days or a few days.

applepickerChoice of projects: Celtic Frame basket, Basket with side handles, Handled carrying basket, Celtic Creel, other projects: apple picker, herb and flower drying basket and plant supports.

Added value: Handouts and book recommendations, short films on basketry shown on projector in evenings.

Venue: Tibetan Shelter next to woodland Newcastle Emlyn West Wales

Camping on site: £5 per person per night.

Dates

Fri-Sun June 5th -8th

Mon-Thurs June 15th-18th

Fri-Sun July 3rd-6th

Cost 4 days £160 (per day £40)

To book a place or more Information

deassart@btinternet.com mob 07964530436

Hedgelaying is for everybody! (Including Women)

DSCF2103After completing the four day hedgelaying course I was very pleased with myself. For years I have assisted on courses, cleared out undergrowth from the hedge, moved tools, set up shelters and made tea! But I did not get stuck in and actually pleach and lay the hedge. I was convinced it would be too physically hard and the thorns were off putting.

After my experience I would say hedgelaying is for everybody, whatever age or gender, we are all capable. There is something magical about the look of a laid hedge and even more magical when you have done it yourself. You do get an intimate knowledge of the hedge and how it works, the words woodland corridor come to life and have meaning. If we go slowly enough the ways come back to us as if it was embedded somewhere in our brains ready to be used once more, whether you are male or female!

While marketing the hedRST - image onlygelaying and coppicing courses, Rural Skills Trust aimed to encourage women in particular to learn hedgelaying, knowing that the men would arrive anyway. We borrowed an image from a great poster taken from the WWII campaign used to recruit for the land army. There was the land army girl holding her farm tool asking for help. We changed it to a hedge tool and rephrased it as ‘We Need More Hedgelayers!’

On Monday morning there were four of us, 3 men and one woman. After the preliminary talk and tour of the hedge line and the important risk assessment we all got stuck in clearing out the hedge. Clearing out a neglected hedge is hard and you have to be right in the bottom of the hedge cutting out bramble and dog rose. By lunchtime the next day I had cleared a good stretch of hedge. Bob the instructor suggested I start laying, so I did. I gathered a range of tools. I started cutting away. It was very satisfying to pleach the hawthorn; the wood is hard and if you don’t get the angle right it bounces off. But when you have sharp tools and persevere the tree breaks off down the length of its base. This is when you really have to drive your billhook down into that gap. A thin strip levers off and bends over, I then had to get in close and steer the tree down the hedge line. Wow it didn’t snap, time to stand back and admire it while I find the pruning saw to cut off and tidy the pleach. I found the small to medium hawthorn to be ok and pavstoolscontrollable.

Finally I tackled some larger stems and found even the largest billhook called the ‘Yorkshire billhook’ unable to cut deep enough. Bob suggested I used an axe and I had to work really hard to get it to peel over, then the next danger was controlling the tree because it was heavy. After I was told that I should have taken more side branches off to lighten the stem. These tips are gold when learning such skills. I didn’t lose it completely but had ripped over half of the pleach off. It still had enough to live on for a while. I got tired slowed down had a chat with the other students. I walked around the field foraged some tasty apples in the hedge and looked from a distance at my work. I felt very pleased.

Nearing the end of the course after surveying everybody’s’ work we all had completed a good bit of hedge. The youngest who had a strong set of shoulders completed the most and planned to find hedgelaying work. The oldest was slower but precise in his work and had an interest in laying hedges for the conservation value. My progress was somewhere in between, I was tired but had no injuries just a few minor prods with the hawthorn.

Coppicing Courses Autumn 2014

November 3rd-5th and November 24th-26th – Cost £90

Why go on this Course?  

IMAG0880Coppicing produces wood fuel which is CO2 neutral. If you coppice a tree and burn the wood it puts CO2 into the atmosphere. Ten or 15 years later the tree has re-grown, and put the same amount of carbon from the air into the tree. It stored the energy of the sun ready to cut and burn again. Regular coppicing will also produce materials suitable for a whole range of products which are 100% biodegradable: small poles for building structures, hurdles, thatching spars, hedge stakes and binders, frame baskets, plant supports,  turned stools, chairs, pegs, handles and  the list is endless! The wildlife and plant value are also enhanced by letting in more light and allowing new growth on the woodland floor. The 3 day course will be a basic introduction into coppice management. No prior skill or experience are needed.

What will you learn on the course?

How to identify the main native broadleaved trees Basic principles of the coppice cycle Coppice products and their uses Practice how to cut a coppice with traditional axes and billhooks. Setting up a cord Coppicing and climate change.

Who will be teaching you? 

 shavinghorses 023Bob Smith is an experienced tutor in traditional rural skills including coppice management, hedge-laying, green woodworking and yurt making. He has worked on environmental projects for 20 years in particular setting up a rural skills school in West Wales where he co-wrote and help deliver a 6 month sustainable rural skills apprentice scheme.

Where will it take place?  

Outdoor and wet weather clothing and footwear are required. All tools will be provided or bring your own. We will be working on a small local farm near Newcastle Emlyn, West Wales. A shelter will be provided near the work site for inclement weather. Please contact us if you have any further questions.

For more info please email or phone Jules Wagstaff Mob 07964530436

Email deassart@btinternet.com  Website http://www.ruralskillstrust.org

Please email or phone Jules Wagstaff Mob 07964530436 Email deassart@btinternet.com

Hedgelaying Course at Bronhydden Fawr, Pentrecagel

Rural Skills Trust has been putting on Hedgelaying courses on a local small farm in Newcastle Emlyn.

DSCF2101

Over the 4 days of the course each person managed to clear out a section of hedge, lay the hedge plants into a new hedge, find and harvest materials for staking and binding, and finally stake and bind a section of hedge. The learning approach is, of course, mostly learning by doing, with a short ‘talking’ session on assessing risks. Those interested in gaining hedge-laying work were given further advice on the types of hedge likely to be found in this area and a guide on pricing the job.

There was a wide range of traditional edged tools available to practice with. The instructor also gave sessions describing the different types of tools available, described their particular and special uses and encouraged each person to have a go with the various types and weights available. Hedgelaying is perfectly achievable by people with a wide range of strengths, especially if you chose the right tool.

DSCF2103

The length of hedge we tackled on the course had been laid previously, but probably not for 20 years. On the four days we concentrated on the hedgelaying operation. The hedge required further hedgerow renovation to form a proper hedge barrier which would have involved some new planting and the banks re-battering.  As a place for learning the skills of hedge-laying it was, however, an excellent location! We are in the process of developing a hedgerow renovation course which will involve the wider skills and knowledge to bring back to life an ailing hedge and bank so watch out for this in next seasons events.

The impact on the environment?

The results from the finished part are really impressive. The different species of hedge plants – mostly hawthorn here – together with the occasional hazel and elm tree have been shaped and laid to form a barrier.  This will develop over the next growing season back into a thick hedge, providing an effective barrier for stock and a dense, deep protective corridor for flora and fauna. The brambles and dog rose will soon return too!

The section here has been regularly staked and bound with hazel. This helps the hedge maintain its structure during the first couple of years after re-laying.

P1040670What is particularly striking about the laid hedge is the clearing out and setting free of young trees. The elm tree pictured here has been cleared of encumbering brambles and thorn and over the next decade will hopefully grow into a young mature tree, standing in the hedge.

We’ll be back up to Bronhydden Fawr to finish the stretch we started next week.

Becoming a Pioneer!

We all accumulate skills in our lives; some seemed to be hard won others we felt we were born to do. It is true that we carry on learning for the whole of our lives and this is healthy and a key to our survival. Some 20 years ago I left higher education with an environmental degree within a few years I had left the city life and was learning to live on a smallholding (housing cooperative) with two small children. What I found was a distinct lack of key practical skills which I had to catch up with fast.

shavinghorses 002The academic life had been a great opportunity but to truly apply and put into action the environmental education of the problems and potential solutions I needed practical skills. Over the years we got these skills by finding people to teach us, teaching ourselves from books and practising until you get things right. But that was hard. From living on a housing coop and working with people coming out of the city life we realised many young people are looking for a way out,  to pioneer a way back on to the land but they need a clear path that gives some confidence that it will be sustainable for them personally, economically and environmentally. That is why finding places and actions to link up with like minded people on the pioneering trail is a good place to start.

Re-skilling ourselves for taking those stepping stones out of the city starts with learning key practical rural skills. Hedgelaying and coppicing are two of them.

Hedgelaying is a key rural skill because it is still respected by farmers and in demand. Well laid hedges provide a stock-proof fence, a significant windbreak which contributes to the welfare of stock and a woodland corridor for birds, plants and small mammals. While learning and practising hedgelaying you gain a whole range of knowledge and skills about trees, plants, tool use, tool care and field scale farming.

Coppicing is a very efficient way of managing woodland to provide fire wood and charcoal as well as materials suitable for a whole range of products which are 100% biodegradable: small poles for building structures, hurdles, thatching spars, hedge stakes and binders, frame baskets, plant supports,  turned stools, chairs, pegs, handles and  the list is endless! But if you want to get into any of these crafts you need the basic materials and this is where coppicing comes into the picture. The wildlife and plant value are also enhanced by letting in more light and allowing new growth on the woodland floor. Coppicing Is one of those simple ways humans can live in harmony with trees, plants and animals. No need to travel to far off places to experience a sustainable system of forestry it is all under our noses. But the first step is learning the skills and knowledge.

After being introduced to this craft you will be able to identify the main coppice species, understand how the coppice cycle works, practice cutting techniques with traditional axes and billhooks and setting up a cord for fire wood. You will also learn the importance of the coppice cycle and how it locks up Carbon from the atmosphere.

Picture 084The Rural Skills Trust is delivering Hedgelaying and Coppice Practice courses this Oct and November in West Wales. The Rural Skills Trust exists to train people in the skills that can encourage and sustain a useful rural economy and livelihoods. We have skills in teaching beginners and those with more experience. We are promoting rural skills to build our community and tackle climate change.

Hedgelaying Course dates

Oct 6th-9th and Oct 13th-16th

Also Saturdays

Oct 4th, 11th, 18th and 25th

Cost £120

Coppice Practice Course dates

November 3rd- 5th and November 24th-26th

Cost £90

For more info please email or phone Jules Wagstaff Mob 07964530436

Email deassart@btinternet.com      Website http://www.ruralskillstrust.org

Smallholders, We Need Your help!

It is a delight to see a newly laid hedge ready for the new growth to spring up from the ground. It is an unmistakable pattern in the landscape. But it is not just the beauty but the benefits it gives to the whole farming environment.

hedgebillA maintained laid hedge is stock proof as one farmer said ‘what the sheep sees through they go through’ another trait of an animal prone to misadventure. The black thorn is the best for this, although it takes a little longer to establish it can be left longer between laying and can even be restored easily if neglected. The windbreak hedges provide is invaluable for stock and crops, it is worth having especially with the winter storms we have been experiencing. The laid hedge also creates shade and shelter for stock. The natural woodland corridor is extended through the farmland along the hedges; this is a habitat for flowers, insects, birds and other wildlife. Many of the insects being controls for aphids and other pests. The standard trees present in the hedges can be maintained to provide a sustainable source of firewood and timber.

The loss of hedgerows is a sorry tale but neglect has been almost as bad an enemy as hedgerow removal.

The convenience and economics of flail cutting has meant that many hedgerows have been given an annual cut and not allowed to grow up, thicken and develop. Frequent and heavy trimming result in hedgerows being reduced to an intermittent line of shrubs, bare at the bottom and the so-called birds nest on top. However if hedges are looked after  properly, maintenance costs are not high. It is the restoration of neglected hedges and bringing them back into a proper cycle of maintenance that is more expensive.

Let’s start by asking ourselves what we can do about it?

In fact if we want more laid hedges we need more hedge layers. As small landowners even if we lay or renovate a small proportion of our hedges each year we are doing something to buck the trend or if we pay a local farm worker we are supporting our local economy and employment.

This Autumn the Rural Skills Trust is offering Hedgelaying courses on a local small farm in Newcastle Emlyn. Why not come along to learn with other local people with an accomplished teacher. Which will give you the confidence to tackle your own hedge.

The Rural Skills Trust has been set up to train people in the skills that can encourage and sustain a useful rural economy and livelihoods. We are promoting rural skills to build our community and tackle climate change. We are based in West Wales

Hedgelaying Course dates

Oct 6th-9th and Oct 13th-16th

Saturdays   Oct 4th, 11th, 18th and 25th

Cost £120

We will also be running Coppice Practice courses in November; this is an introductory 3 day course on a Newcastle Emlyn smallholding.

Coppice Practice Course dates

November 3rd-5th and November 24th-26th

Cost £90

For more info please email or phone Jules Wagstaff Mob 07964530436

Email deassart@btinternet.com  Website http://www.ruralskillstrust.org

Rural Skills in West Wales